Frankly, why even use words when you can say it all with a pretty GIF, right?
However, there arise a few scenarios now and then for which finding the perfect GIF seems impossible. Even after searching every nook and cranny and going through the internet with a fine-mesh sieve, the perfect GIF just eludes us.
3 Ways to Create a GIF on Windows 10
Worry not my friend, today, in this article we will go over a couple of methods to make our very own GIFs for those oh-so-special occasions and learn how to stop relying on platforms like Tenor or other online services for our gif needs.
3 Ways to Create a GIF on Windows 10 Method 1: Create a GIF on Windows 10 using GIPHY Method 2: Create a GIF using ScreenToGif Method 3: Make a GIF using Photoshop
Method 1: Create a GIF on Windows 10 using GIPHY
Yeah yeah, we know we said we’ll teach how to stop relying on online services for GIFs but if there’s one single place where you can find all things GIFs, it is Giphy. The website has become synonymous with GIFs and serves more than a billion of them on a daily basis across multiple mediums. Not only is GIPHY an ever-expanding library of all kinds of GIFs imaginable, but the platform also lets you create your own little loopy videos without sound aka GIFs, and save them for future use. Creating GIFs using GIPHY on Windows 10 is very simple and can be accomplished in a couple of easy steps. Step 1: As obvious, you will need to open the website in order to get started. Just type in the word GIPHY in the search bar of your preferred web browser, hit enter and click on the first search result that appears or better yet, just click on the following link.
Step 2: Once the website has loaded, on the top right side look for the option to Create a GIF and click on it.
Step 3: Now, there are multiple ways in which you can proceed forward and create GIFs. The three options that GIPHY provides is: combining multiple images/pictures into a loopy slideshow, selecting and trimming a specific portion of a video you might have on your personal computer, and finally, making a GIF out of a video that already exists on the internet. All of these can be further customized using texts, stickers, filters, etc.
You will need to log in or sign up on GIPHY before going forward with any of the above-discussed methods. Fortunately, both the processes are quite easy (as one would expect). Unless you are a robot, just fill in your mail address, pick a username, set a strong security password and you will be good to go. Step 4: Let’s try to make a GIF from a couple of images first. Here, for the purpose of an example, we will be using some random cat images that we got off the internet. Just click on the panel that reads ‘Choose Photo or GIF’, locate the images you would like to make a GIF out of, select them and click on Open or simply press Enter.
Sit back and let GIPHY do its magic while you imagine all the scenarios and group chats you can use the newly created GIF in. Step 5: Adjust the image duration according to your liking by moving the lever to the right or left. By default, a maximum time of 15 seconds is divided equally among all the pictures. Once you are happy with the image duration, click on Decorate at the bottom right side to further customize the gif.
In the decorate tab, you will come across options to add a caption, stickers, filters and even draw over the gif yourself. Play around with these features to make a GIF of your liking (we recommend using the Fancy style with the Typing or Wavy animation using 2D animation software) and click on the Continue To Upload.
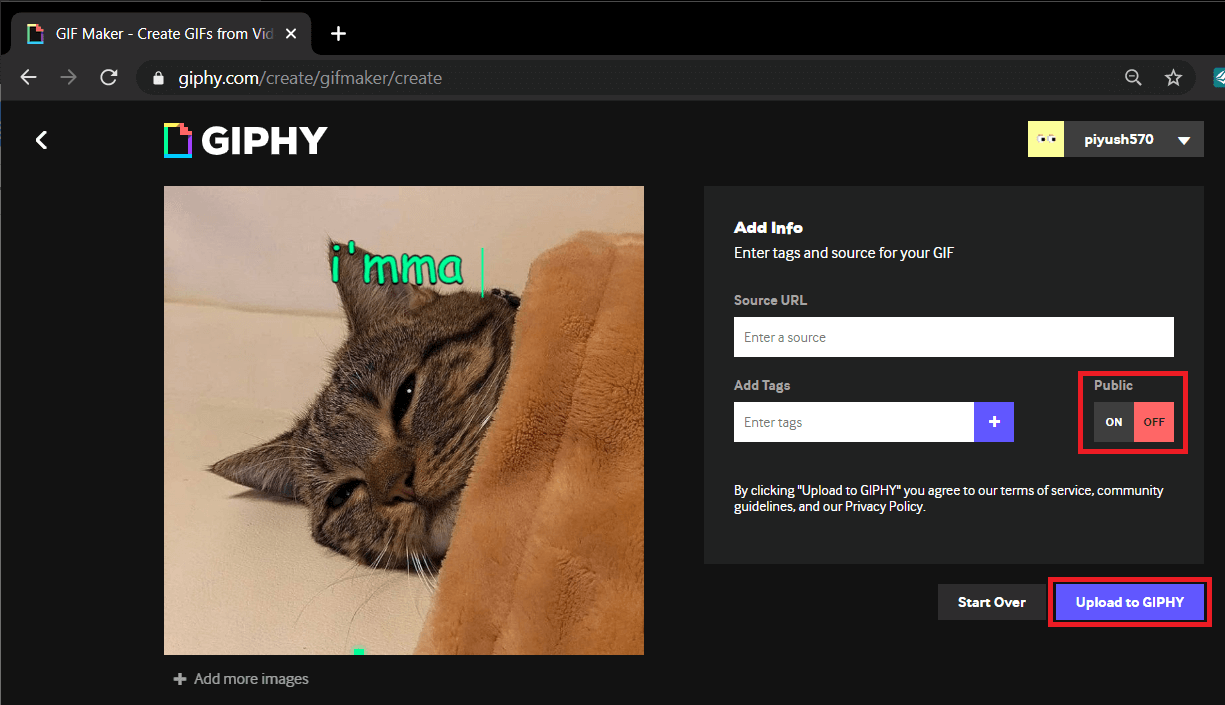
Step 6: If you wish to upload your creation on GIPHY then go ahead and enter a few tags to make it easier for others to discover it and finally click on Upload to GIPHY.
However, if you want the gif to only yourself, toggle the Public option to OFF and then click on Upload to GIPHY. Wait for GIPHY to finish ‘Creating Your GIF’.
Step 7: On the penultimate screen, click on Media.
Step 8: Here, click on the Download button next to the Source label to download the gif you just created. (You can also choose to download the gif for social media sites/a small size variant or in .mp4 format)
The procedure remains identical when creating a GIF by trimming an offline or an online video. Also Read: 3 Ways to Download Facebook Videos on iPhone
Method 2: Create a GIF using ScreenToGif
Next up on our list is a lightweight application known as ScreenToGif. The application takes it a notch higher and lets you record yourself through the webcam and turn those silly faces into a usable gif. Apart from this, the application also lets you record your screen and turn the recording into a gif, open up a drawing board and turn your sketches into a gif and a general editor to trim and convert offline media into gifs. If you face any issues, read How to Fix faulty GIFs on Android here. Step 1: Open the website (https://www.screentogif.com/) on your preferred web browser to download the installation file and proceed to install it.
Step 2: Launch the application once you are done installing it and click on the option you would like to go forward with. (We will be demonstrating how to make a gif using the Record method, however, the procedure remains identical when using other methods)
Step 3: A transparent window with a slight border with options to Record, Stop, Adjust frame rate (fps), resolution, etc. will appear on the screen once you click on Recorder.
Click on Record (or press f7) to start recording, open up a video you would like to record and turn into a gif or proceed to performing the action you would like to record. When you are done, click on stop or press f8 to stop recording. Step 4: When you stop recording, ScreenToGif will automatically open up the Editor window to let you watch your recording and perform further edits to your GIF.
Switch to the Playback tab and click on Play to watch your recorded GIF come to life.
Step 5: Use the in-built features to customize the gif to your liking and once you are happy with it click on File and choose to Save as (Ctrl + S). By default, the file type is set to GIF but you could also choose to save in other file formats. Select the destination folder to save to and click on Save.
Also Read: How to Switch to OpenDNS or Google DNS on Windows
Method 3: Make a GIF using Photoshop
This method may not be the easiest of all available methods but does provide the best quality of GIFs. Disclaimer: As obvious, you will need to have Photoshop installed on our personal computer before going forward with this method. Step 1: Start by recording the video bit you would like to turn into a GIF. This could be achieved by a variety of applications, the easiest being our very own VLC media player. To record using VLC, open the video you would like to record using VLC, click on the View tab and toggle on ‘Advanced Controls’.
You should now see a small bar over the existing control bar with the options to record, snapshot, a loop between two points, etc. Adjust the playhead to the portion you would like to record, click on the red dot to start recording and press play. Once you have recorded the segment you like, click on the record button again to stop recording. The recorded clip will be saved in the ‘Videos’ folder on your personal computer. Step 2: Now it is time to fire up Photoshop, so go ahead and open the multi-purpose application. Once open, click on File, select Import and finally choose Video Frames to Layers.
Step 3: Trim the video to the exact duration you would like using the handles and import.
After importing, you can further customize each frame by using the filters and text tool options.
Step 4: Once you are happy with your customizations, click on File then Export, and Save For Web to save the GIF.
Step 5: The Save for Web window will open, where you can customize various settings related to GIF.
Step 6: In the following dialog box, change the settings as you wish and under Looping Options choose Forever.
Finally, hit Save, give your GIF a suitable name, and save in a specific folder.
Recommended: How to Delete Items From Continue Watching On Netflix? While the above-mentioned methods are our favorites (also tried and tested), there are a plethora of other applications and methods that let you make or create your own GIFs on Windows 10. For starters, there are easy-to-use applications like LICEcap and GifCam while advanced users can give applications such as Adobe Premiere Pro a shot to satisfy their GIF needs.