How to Fix ARK Unable to query server info for invite Error
There are a variety of reasons behind it. However, some primary reasons are listed below:
How to Fix ARK Unable to query server info for invite Error Method 1: Reset Windows Sockets Method 2: Auto-Connect to the Game Server Method 3: Redirect Port for Your Router Method 4: Verify Integrity of Game Files Method 5: Join Using In-Game Server Method 6: Disable or Uninstall Third-party Antivirus Method 7: Allow ARK: Survival Evolved through Firewall Method 8. Use ARK Server Hosting Method 9: Reinstall Steam
Problem with Windows Sockets: The Unable to query server info for invite issue occurs due to connectivity issues with Windows Sockets. Thus, resetting these should help. Auto-Connection Failure: If the auto-connection feature is not enabled in the game, then this error will be triggered on your device. Port Unavailability: If you have multiple ports in your system engaged with other programs, the said issue arises. You should unblock some essential ports to be used by the game. The internet settings also need to be adjusted accordingly. Conflict with Third-Party Antivirus: Some third-party antivirus software prevents potentially harmful programs from being accessed on your system. However, in some cases, trusted applications are also blocked, leading to unable to query server info for an invite issue. Issues with Windows Firewall: Windows Firewall is an in-built application on Windows systems that acts as a filter. It scans all information received online and blocks out the unsafe data but, might cause this too.
Follow the below-mentioned methods, one by one, till you find a fix to this issue.
Method 1: Reset Windows Sockets
The primary root cause behind this problem is a faulty Winsock catalog. Hence, this catalog needs to be reset to its original settings, as follows:
Type cmd in the Windows search bar and click on Run as administrator to launch Command Prompt with administrative privileges.
Type netsh winsock reset and hit Enter, as shown.
Wait for the reset process of Windows Sockets to be completed and a confirmation message to appear.
Method 2: Auto-Connect to the Game Server
Using the Launch option, you can connect to your favorite server automatically and avoid ARK keeps crashing or Unable to Query Server Info for Invite issue. For example, if your server has switched to a new IP address or facing connectivity issues with the current server, you can remove it and connect to a new server. Follow the given steps to implement this server change using the Launch option:
Search for Steam in Windows search bar to launch it, as shown.
Switch to the LIBRARY tab, as highlighted.
Right-click on ARK: Survival Evolved and select the Properties option in the context pop-up menu.
Under the GENERAL tab, select SET LAUNCH OPTIONS…, as depicted below.
Here, delete Connect Server-IP: port entry. Note 1: The server-IP and port fields are actual numbers, and they represent the server. Note 2: If you cannot find server details in the SET LAUNCH OPTIONS window, then find the IP address of your server by typing connect <your_server_IP>
Save the changes and exit Steam. Verify if you can play ARK: Survival Evolved game without facing unable to query server info for invite issue. If not, try the next fix. Also Read: How to Open Steam Games in Windowed Mode
Method 3: Redirect Port for Your Router
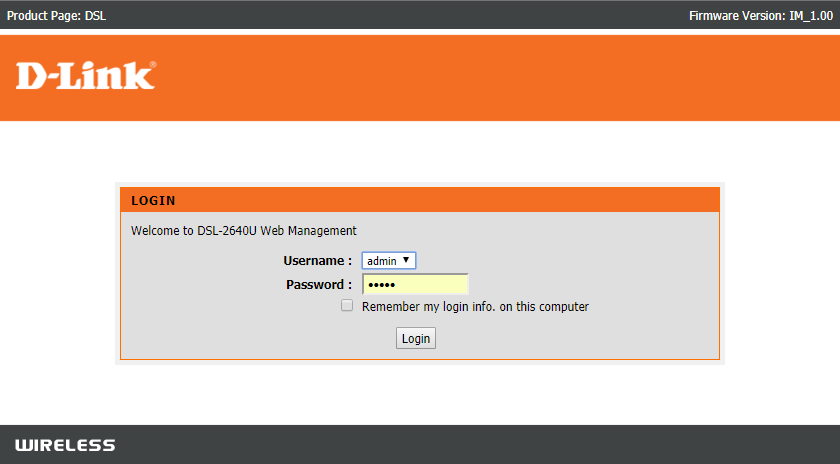
Launch a Web browser. Then, type your IP address in the URL bar, as shown.
Type the username and password of your router. Note: You can find your login details on the sticker pasted on the router.
Click on the option titled Enable Port Forwarding or something similar.
Now, create the following Ports: TCP / UDP Ports: 7777 and 7778 TCP / UDP Port: 27015
Apply the changes and restart your router and computer.
Method 4: Verify Integrity of Game Files
Read our guide on How to Verify Integrity of Game Files on Steam to repair ARK game files and to fix all errors & glitches being caused by corrupt or missing game files. This method worked for many users hence, we recommend it as well.
Method 5: Join Using In-Game Server
When gamers tried to join ARK server from the Steam Server directly, they experienced unable to query server info for invite issues more often. Hence, we might be able to fix it by joining ARK using an in-game server, as explained below:
Launch Steam and click on View from the toolbar.
Select Servers, as shown.
Redirect to the FAVORITES tab and select the ADD A SERVER option from the bottom of the screen.
Now, type the server IP address in the Enter the IP address of the server you wish to add field.
Then, click on ADD THIS ADDRESS TO FAVORITES option, as highlighted.
Now, launch ARK and select the Join ARK option.
From the bottom left corner, expand the Filter options and add the Session Filter to Favorites.
Refresh the page. You will be able to see the server you have just created. Here onwards, join ARK using this server to avoid the unable to query server info for invite issue altogether.
Method 6: Disable or Uninstall Third-party Antivirus
Method 6A: You can temporarily disable the third-party antivirus installed on your system to resolve conflicts between it and the game. Note: The steps will vary according to the Antivirus program. Here, Avast Free Antivirus has been taken as an example.
Right-click on the Avast Free Antivirus in the Taskbar.
Now, select Avast shields control, as shown.
Choose any of these options to disable Avast temporarily:
Disable for 10 minutes Disable for 1 hour Disable until computer is restarted Disable permanently
Try connecting to the game server now. Method 6B: To resolve this issue, you can uninstall the third-party antivirus software, as follows:
Launch Avast Free Antivirus program on your computer.
Click on Menu visible in the top right corner.
Now, click on Settings, as shown.
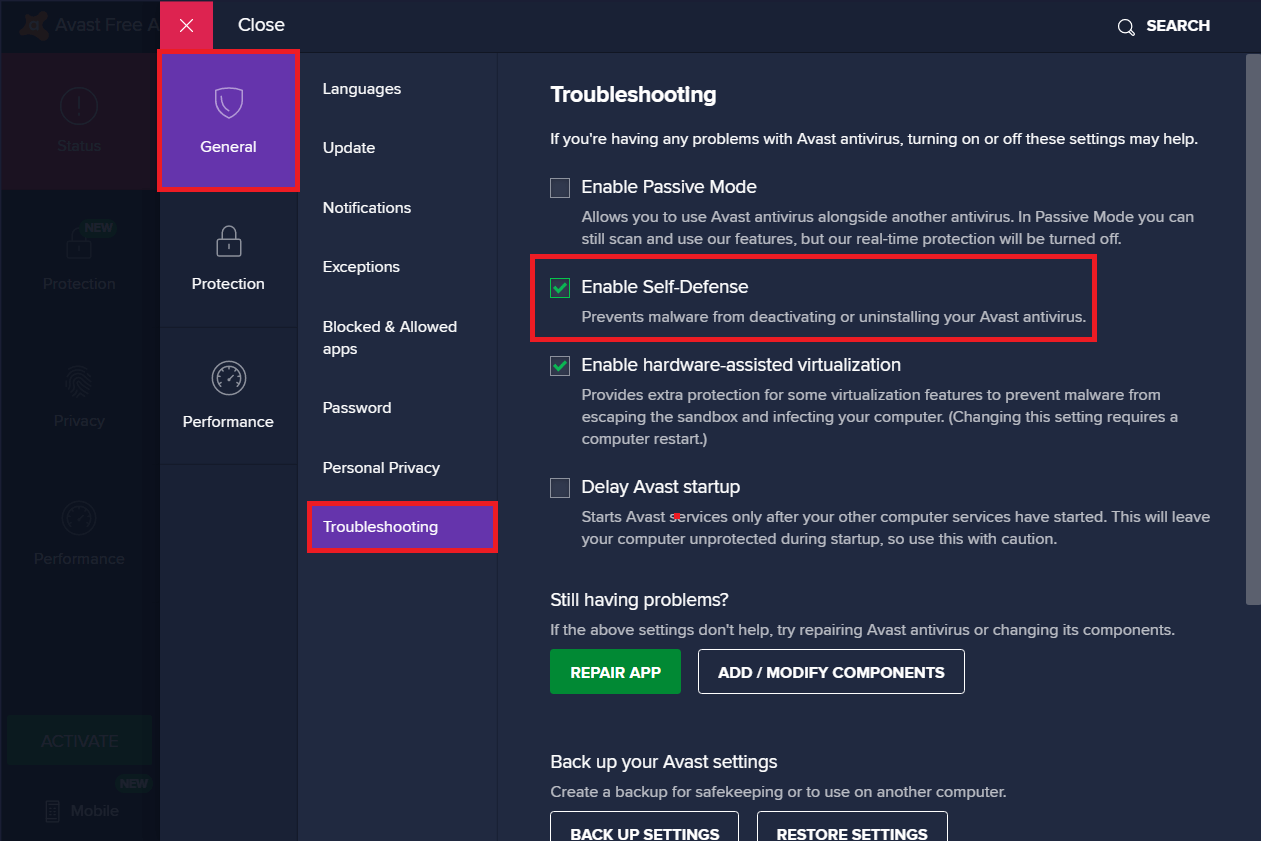
Under the General tab, navigate to the Troubleshooting section.
Uncheck the box next to Enable Self-Defense, as depicted.
A prompt will be displayed on the screen. Click on OK to disable Avast.
Exit Avast Free Antivirus program.
Next, launch Control Panel by searching for it, as shown.
Select View by > Small icons and then, click on Programs and Features, as depicted.
Right-click on Avast Free Antivirus and then, click on Uninstall, as illustrated below.
Proceed by clicking Uninstall in the confirmation prompt. Then, wait for the uninstallation process to finish. Note: Depending on the file size of the Antivirus software, the time taken to uninstall it, will vary.
Reboot your Windows PC and check if this could fix ARK unable to query server info for invite issue. Also Read: 5 Ways to Completely Uninstall Avast Antivirus in Windows 10
Method 7: Allow ARK: Survival Evolved through Firewall
Whenever you install a new application on your device, a prompt will appear on your screen asking whether the application should be added as an Exception to Windows Defender Firewall or not.
If you click YES, the application you have recently installed is added as an exception to Windows Firewall. All its features will work, just as expected. But, if you select NO, then Windows Firewall will block the application from connecting to the Internet whenever it scans your system for suspicious content.
This feature helps to maintain and protect system information and privacy. But it may still cause conflicts with trustworthy applications like Steam and ARK: Survival Evolved. Like third-party antivirus software, you can temporarily disable Windows Defender Firewall or allow access to ARK: Survival Evolved program permanently. Method 7A: Disable Windows Defender Firewall Temporarily Several users reported that when Windows Defender Firewall was turned OFF, the unable to query server info for invite issue didn’t occur. You can try it too, by following these steps:
Launch Control Panel as instructed in the previous method.
Click on Windows Defender Firewall, as shown.
Select the Turn Windows Defender Firewall on or off option from the left panel.
Now, check the box titled Turn off Windows Defender Firewall (not recommended) option for Domain, Private & Public network settings.
Method 7B: Allow ARK: Survival Evolved in Windows Defender Firewall
Launch Control Panel. Navigate to Windows Defender Firewall, as per Method 7A.
Click on the Allow an app or feature through the Windows Defender Firewall option from the left panel, as highlighted.
Now, click on the Change settings button.
Select ARK: Survival Evolved program in the list and check the boxes under Private and Public options, as highlighted. Note: Remote Desktop has been taken as an example in the screenshot given below.
Finally, click on OK to implement these changes. It is recommended to allow ARK: Survival Evolved program rather than blocking the application or disabling Windows Defender Firewall because it is a safer option. Method 7C: Block Incoming Connections in Windows Defender Firewall In the last decade, cybercrime has reached its peak. So, we need to be more cautious while surfing online. In addition to the above, you can disallow all incoming data connections with the help of a Windows Firewall, as explained below:
Navigate to Control Panel >Windows Defender Firewall, as earlier.
Under Public network settings, check the box marked Block all incoming connections, including those in the list of allowed programs, as depicted.
Click on OK. Also Read: How to Fix Steam Not Downloading Games
Method 8. Use ARK Server Hosting
Even the most popular games encounter errors, and you can fix these by fetching help from professional support services like ARK Server Hosting. It provides better network availability and quickly resolves all server connectivity errors. It also offers an excellent file management system. Furthermore, it has been known to fix unable to query server info for invite issue. Hence, both novice and advanced users are advised to utilize ARK Server Hosting. If you want to create your own ARK server hosting, then you can read this guide on how to create an ARK server hosting.
Method 9: Reinstall Steam
If none of the above methods have worked, the last resort is to reinstall Steam. Here’s how to fix ARK unable to Query Server Info for Invite error:
Type Apps in the Windows search bar. Click on Apps & features to launch it, as shown.
Type Steam in Search this list field.
Finally, click on Uninstall under Steam app, as depicted below.
Once the program has been deleted from your system, you can confirm by searching for it again. You should receive this message We couldn’t find anything to show here. Double-check your search criteria.
Restart your computer, once you complete all the steps mentioned above.
Click here to download Steam on your Windows 10 PC.
Go to My downloads folder and double-click on SteamSetup to open it.
Here, click on the Next button until you see the Choose Install Location screen.
Next, choose the Destination Folder by using the Browse… option. Then, click on Install.
Wait for the installation to be completed and click on Finish.
Now, wait for all Steam packages to be installed in your system.
Now, you have successfully reinstalled Steam on your system. Download ARK: Survival Evolved game and enjoy playing it, without any errors. Recommended:
How to Fix Hulu Token Error 3 Fix Destiny 2 Error Code Broccoli Fix Fallout 3 Ordinal 43 Not Found Error 18 Ways to Optimize Windows 10 for Gaming Fix io.netty.channel.AbstractChannel$AnnotatedConnectException Error in Minecraft
We hope that this guide was helpful and you were able to fix the ARK Unable to query server info for invite issue in your device. Let us know which method worked for you the best. Also, if you have any queries/comments regarding this article, then feel free to drop them in the comments section.


